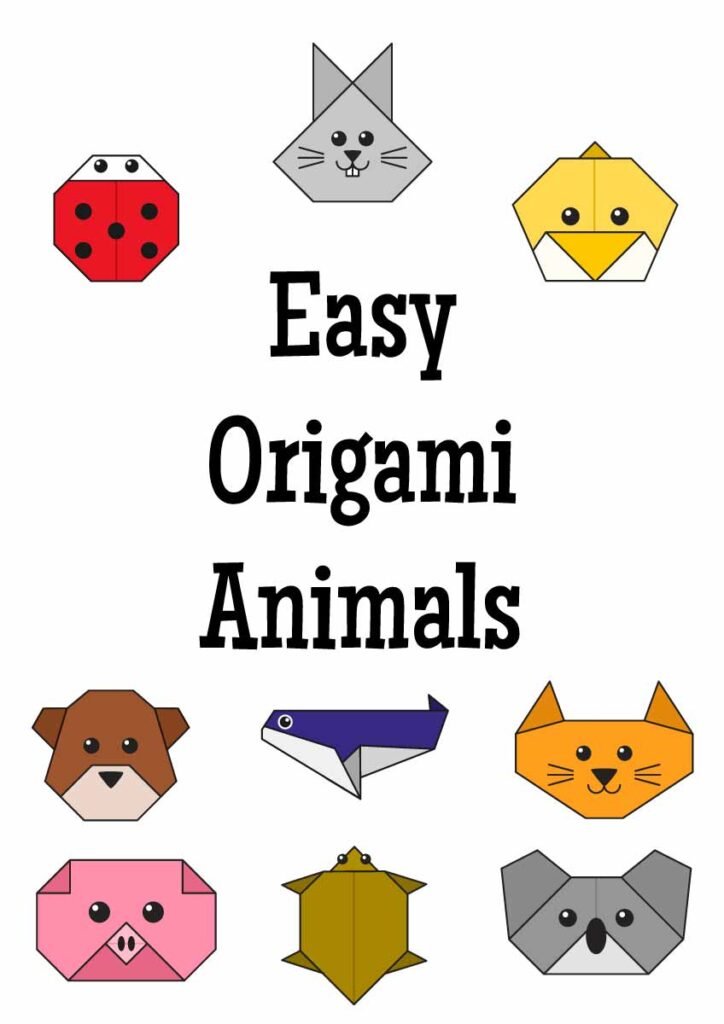
Easy origami animals
Origami is a wonderful art that can be made by people of all ages. Some paper folding can be extremely complex but here we are looking at very simple origami designs that can be accomplished by anyone. These easy origami animals require a small number of basic steps to complete and leave you with cute paper creatures.
Each of these craft activities has step-by-step instructions with pictures to follow making the process a complete piece of cake! Kids and young learners will absolutely love making the easy origami animals which they can later take home or use to add to larger projects.
The actual folding process of these paper animals only takes a few minutes so it can be a good idea to make several of these creations in one sitting or class. Once learners know how to make origami animals, further time can be spent decorating them and making the pieces look extra special.
The free printable origami instructions below are ordered by difficulty. The animals with the fewest number of steps are at the top of the page while the harder ones with more steps can be found at the bottom.
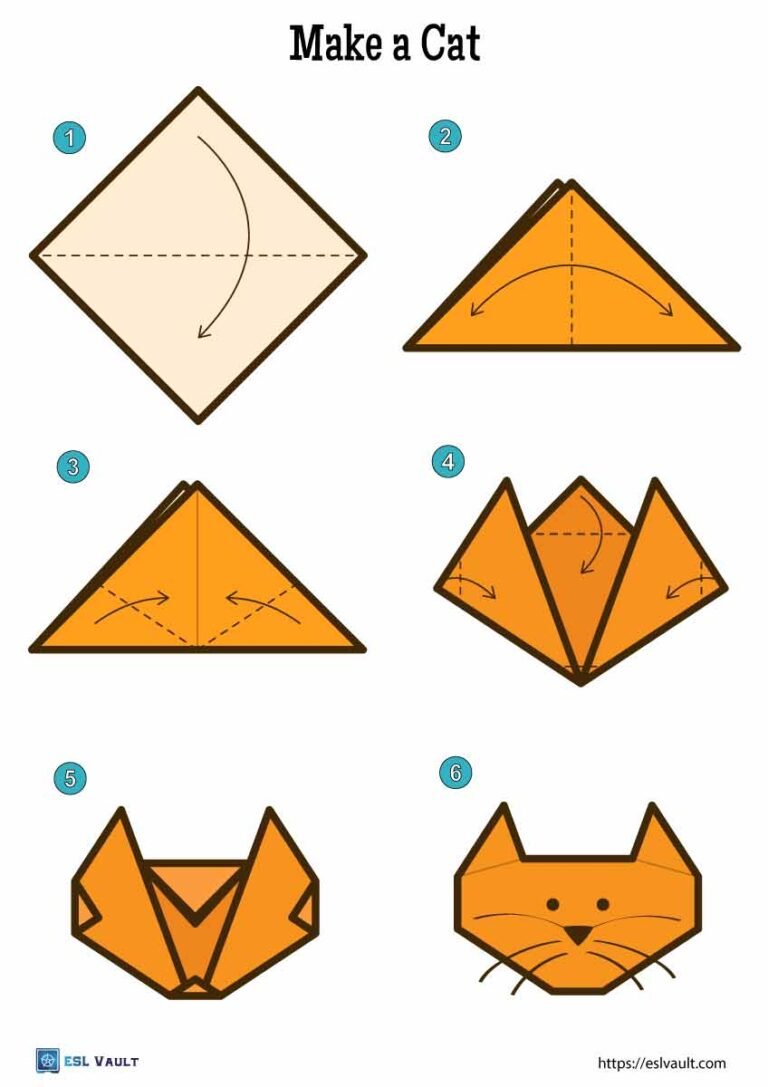
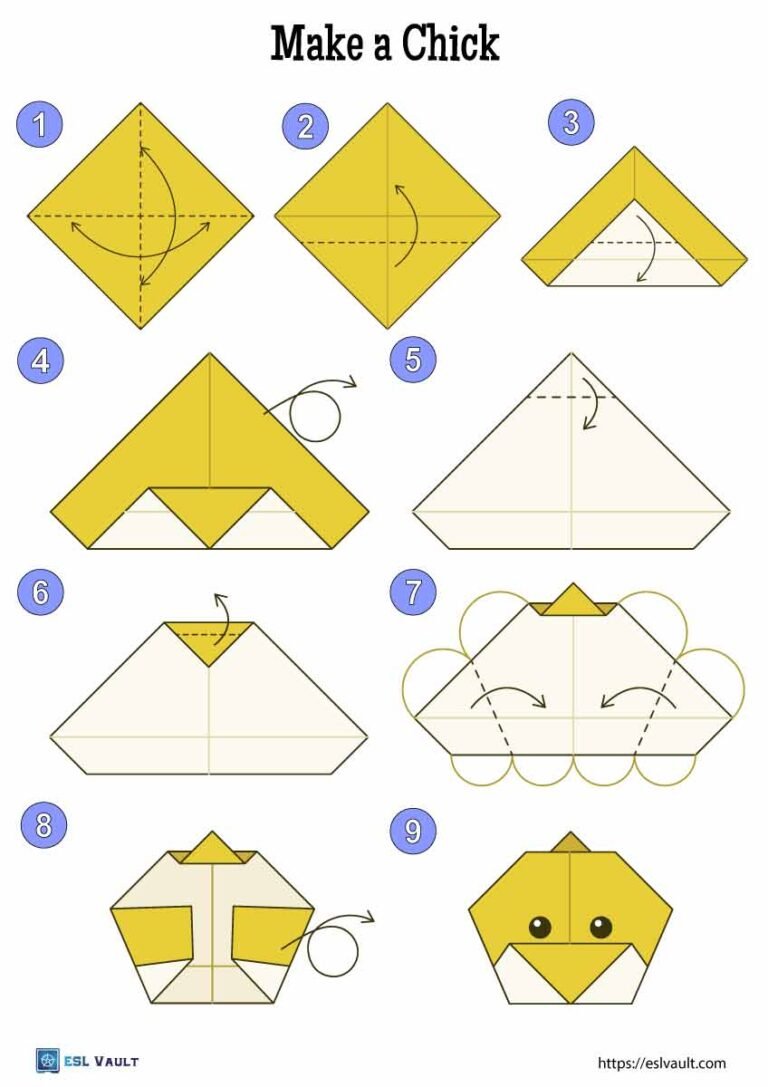
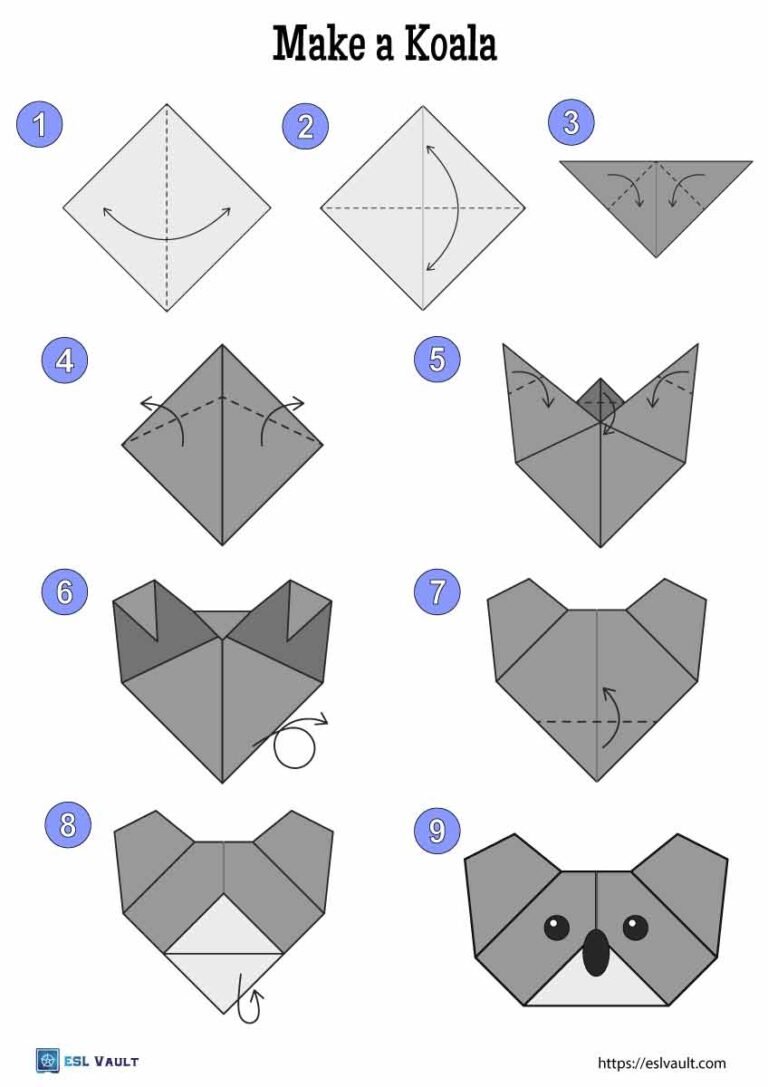
Note that in the origami instructions, a dotted line represents a crease or fold. Arrows show the direction in which to fold the paper. An arrow with a loop simply means you should turn the piece of origami over to its other side.
Easy origami cat
This simple origami cat has only 6 steps to follow. Once completed you will want to add whiskers and other facial features with a pen.
A fun thing you can do with this and other pieces in this simple origami animal set is to draw the rest of the body or a background scene on another sheet of paper.
After that, take the finished cat and stick it to the new background layer to create a more stunning visual!
What you will need for the easy origami animals
You need only a few simple things to make these step-by-step origami animals. Before starting make sure that you have –
1 – Square pieces of paper. You can use pretty much any kind of paper that you like, from store-bought origami paper to plain white printing paper, it doesn’t really matter. The essential thing is that you start with a perfectly square piece of paper.
Actual origami paper has the advantage of being square and colored on one side. You can always cut to shape and pre-color plain sheets of A4 paper. Another option is to color the beginner’s origami animals once they are completed.
2 – Crayons, pencils, and markers. These are needed to add the finishing touches to your origami artwork. A marker or black pen is required to draw the eyes, nose, whiskers, and so forth on your animals.
The examples on the printable instructions here are rather simple. With colored pens and crayons, along with a little creativity, you can add more details to your origami art to make it one of a kind.
3 – Scissors. These are only necessary to make the turtle in this paper-folding craft set. They can however be handy to add extra touches to the completed animals if you feel like going that extra mile.
You can cut out separate things like whiskers, skin patterns, and noses to stick to your origami and give it a more 3-dimensional effect. This of course will also require you to have some glue on hand.
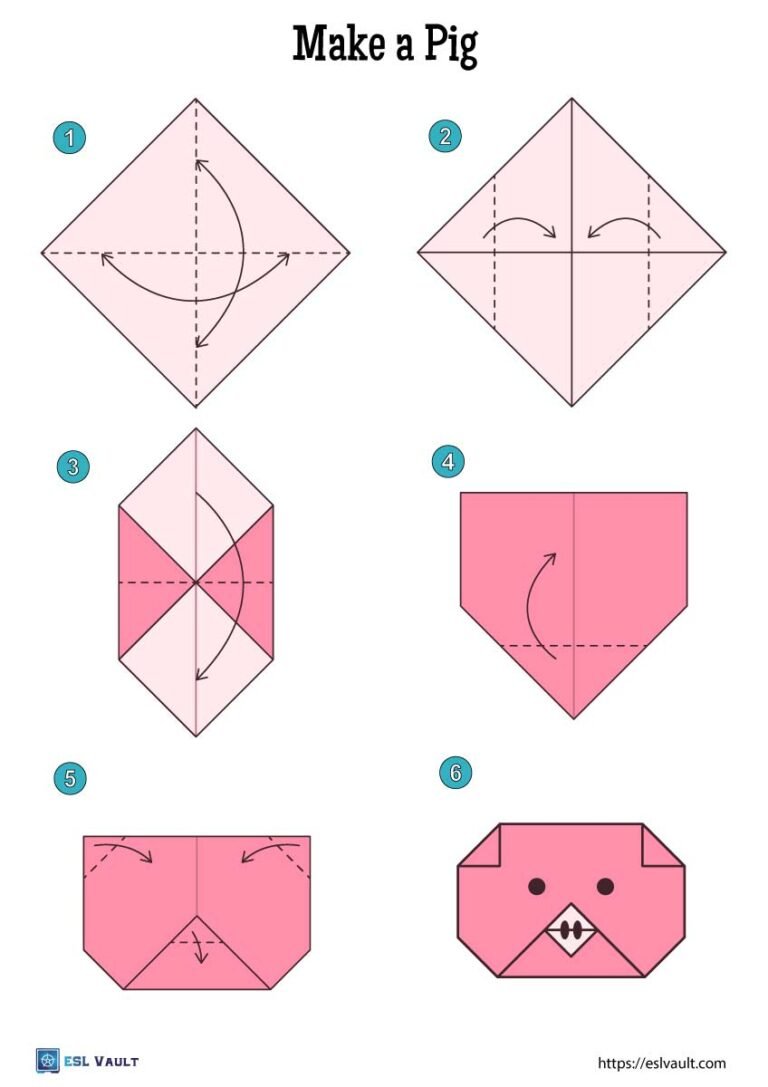
Easy origami pig
Another cute animal with just a few basic steps to complete. This art activity works well to complement children’s lessons that are all about farm animals.
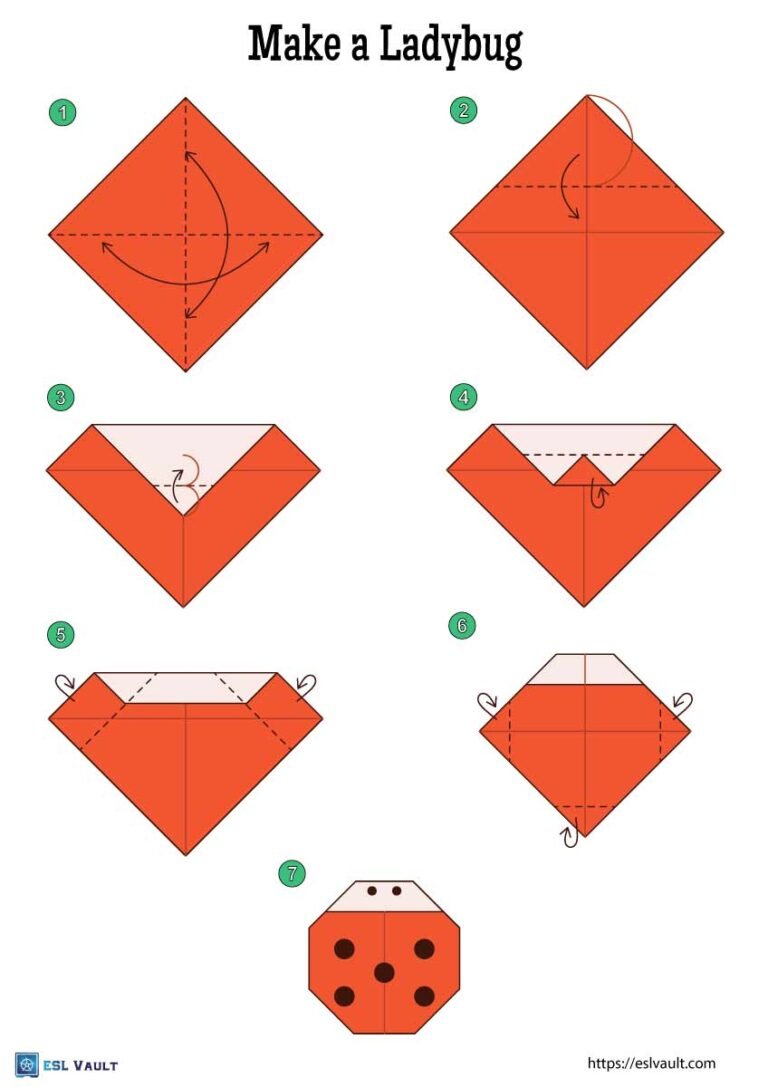
Easy origami ladybug
This origami ladybug is quite cute once it has been decorated. You might want to add some legs or even wings to finish it of!
An interesting way to use this piece for teaching is to make several lady bugs with different amounts of big black dots on their backs. This way the ladybugs can be used in activities and games to help kids learning numbers and how to count.
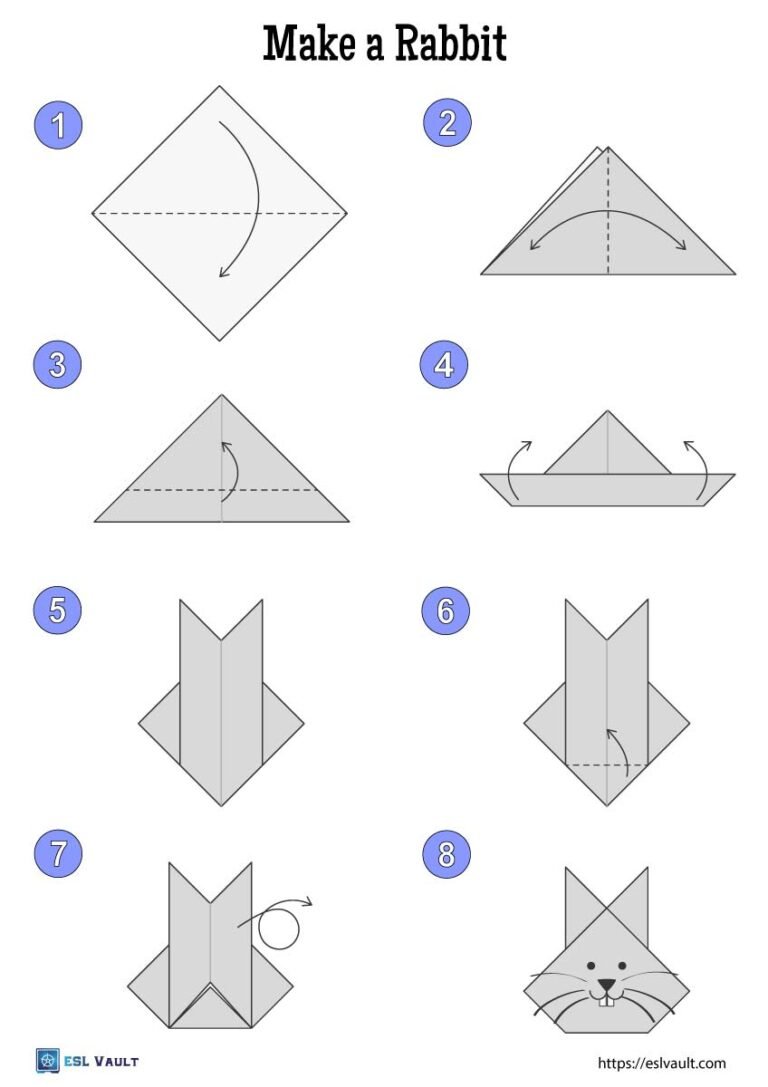
Easy origami rabbit
A happy origami bunny that is perfect for Easter-themed classes. To make this one really cool, try cutting out some extra large teeth to stick to its face.
You may even want to draw and cut out a nice orange carrot for the rabbit to eat.
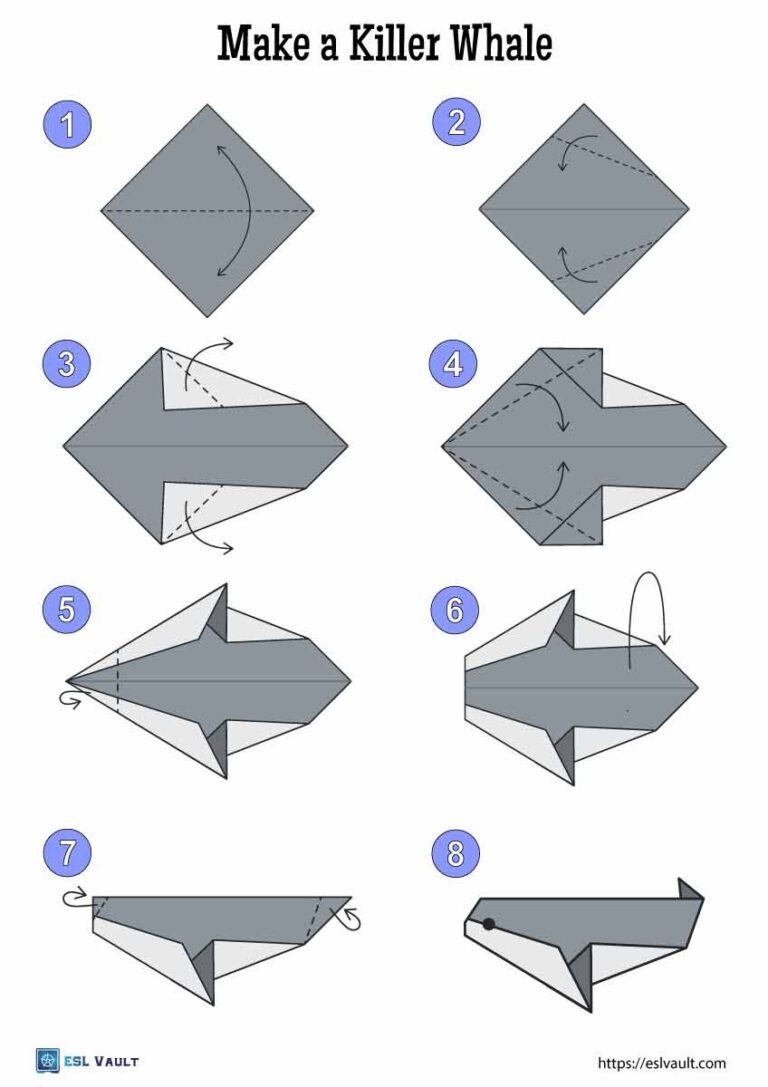
Easy origami killer whale
This killer whale or orca will benefit from some extra skin patches on its back. You can use it o create an underwater scene or just for a fun filler activity for lessons about ocean animals.
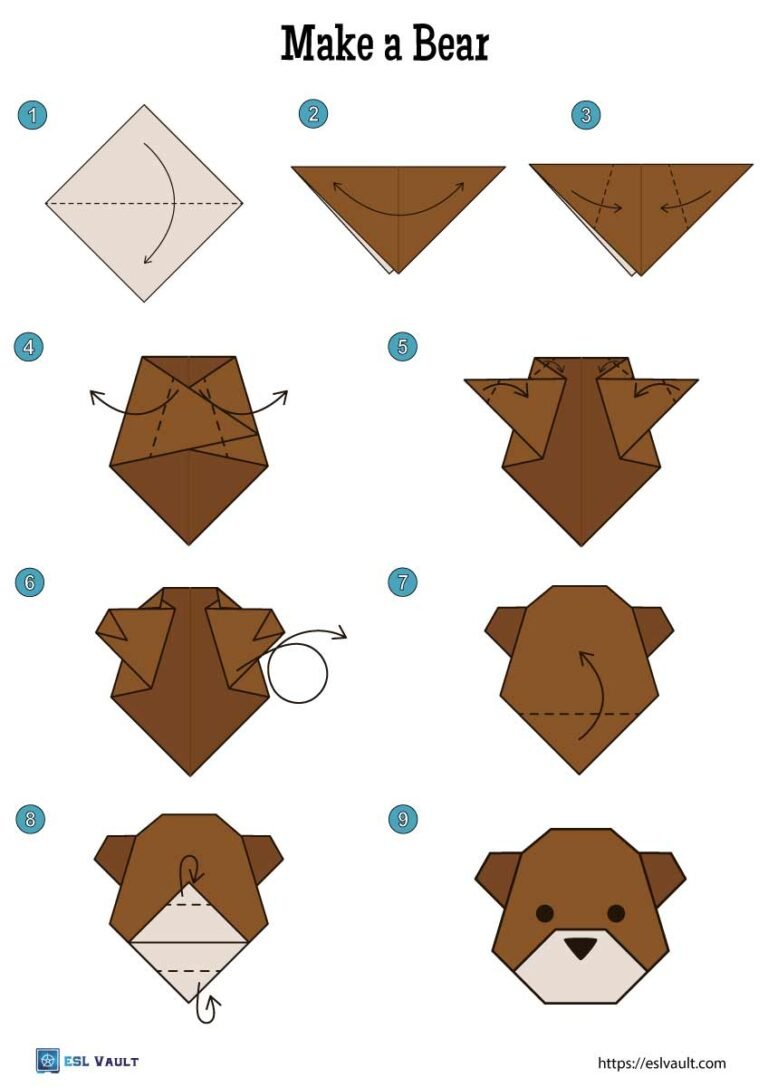
Easy origami bear
This bear is brown in the example but it isn’t a rule. All the origami animals here can be colored in any way you or your students see fit.
Try adding some extra colors to the animals such as pinks and reds for the inner parts of the ears and the mouths. If you feel like it go completely technicolor and make some psychedelic rainbow creatures!
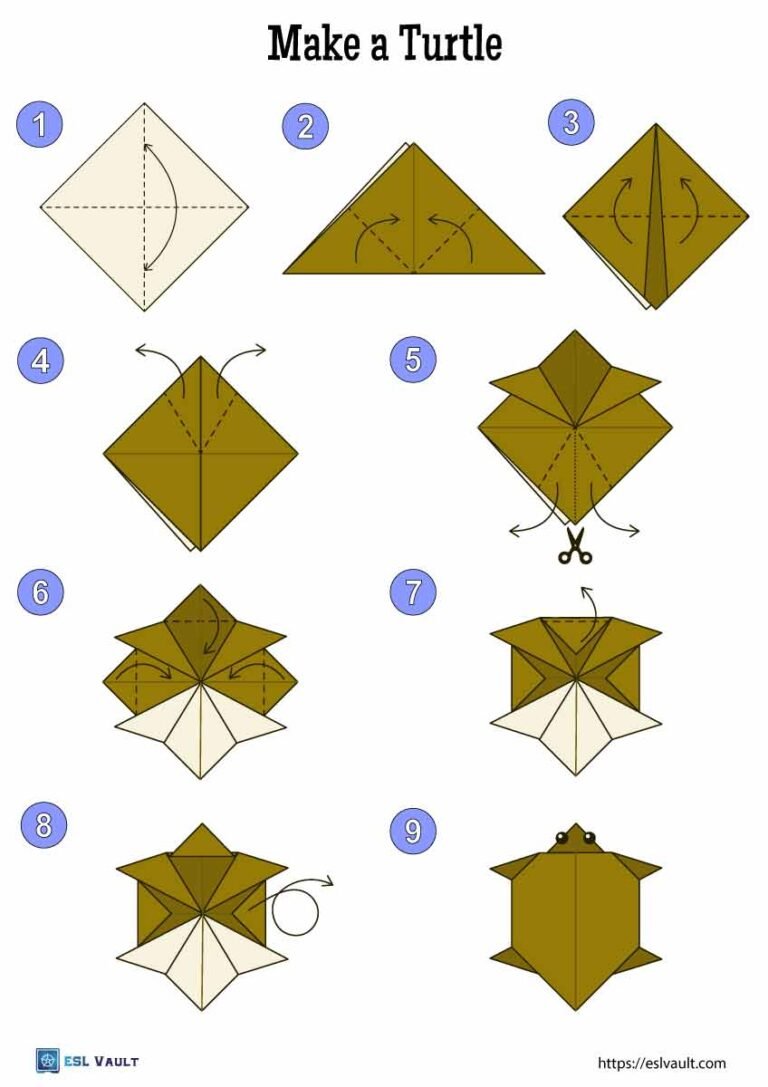
Easy origami turtle
This origami turtle is one of the hardest pieces on this page. It has nine steps to complete and even requires scissors at one point.
once you are done making it you will want to use pens and crayons to add some nice details to the shell on its back
A brief history of origami
The art of origami or paper folding has a somewhat blurry origin. It has been practiced in various forms around the globe at different times in history. The Japanese version of the craft is where the word origami comes from and can be directly translated as folded (ori) paper (kami).
Originally called orikata (folded shapes), origami began to be practiced in Japan after the introduction of paper to the country sometime in the 6th century. The art form really took off and became popular in Japan during the Edo period from 1603 to 1868. Prior to this paper was quite an expensive commodity so the craft was not easily accessible to the average person.
Easy origami chick
This easy chick looks somewhat like a duck. You can try this paper-folding craft with students learning about farms or birds.
Note that the arched lines in step 7 just mean that the creases and folds should be exactly in the middle of that part of the paper.
Easy origami koala
The lovely koala is one of the most iconic Australian animals. To add more to this origami art, try making some gum leaves for the koala to eat or a tree it can sleep in.

